Introduction
About Siso Smart Hub
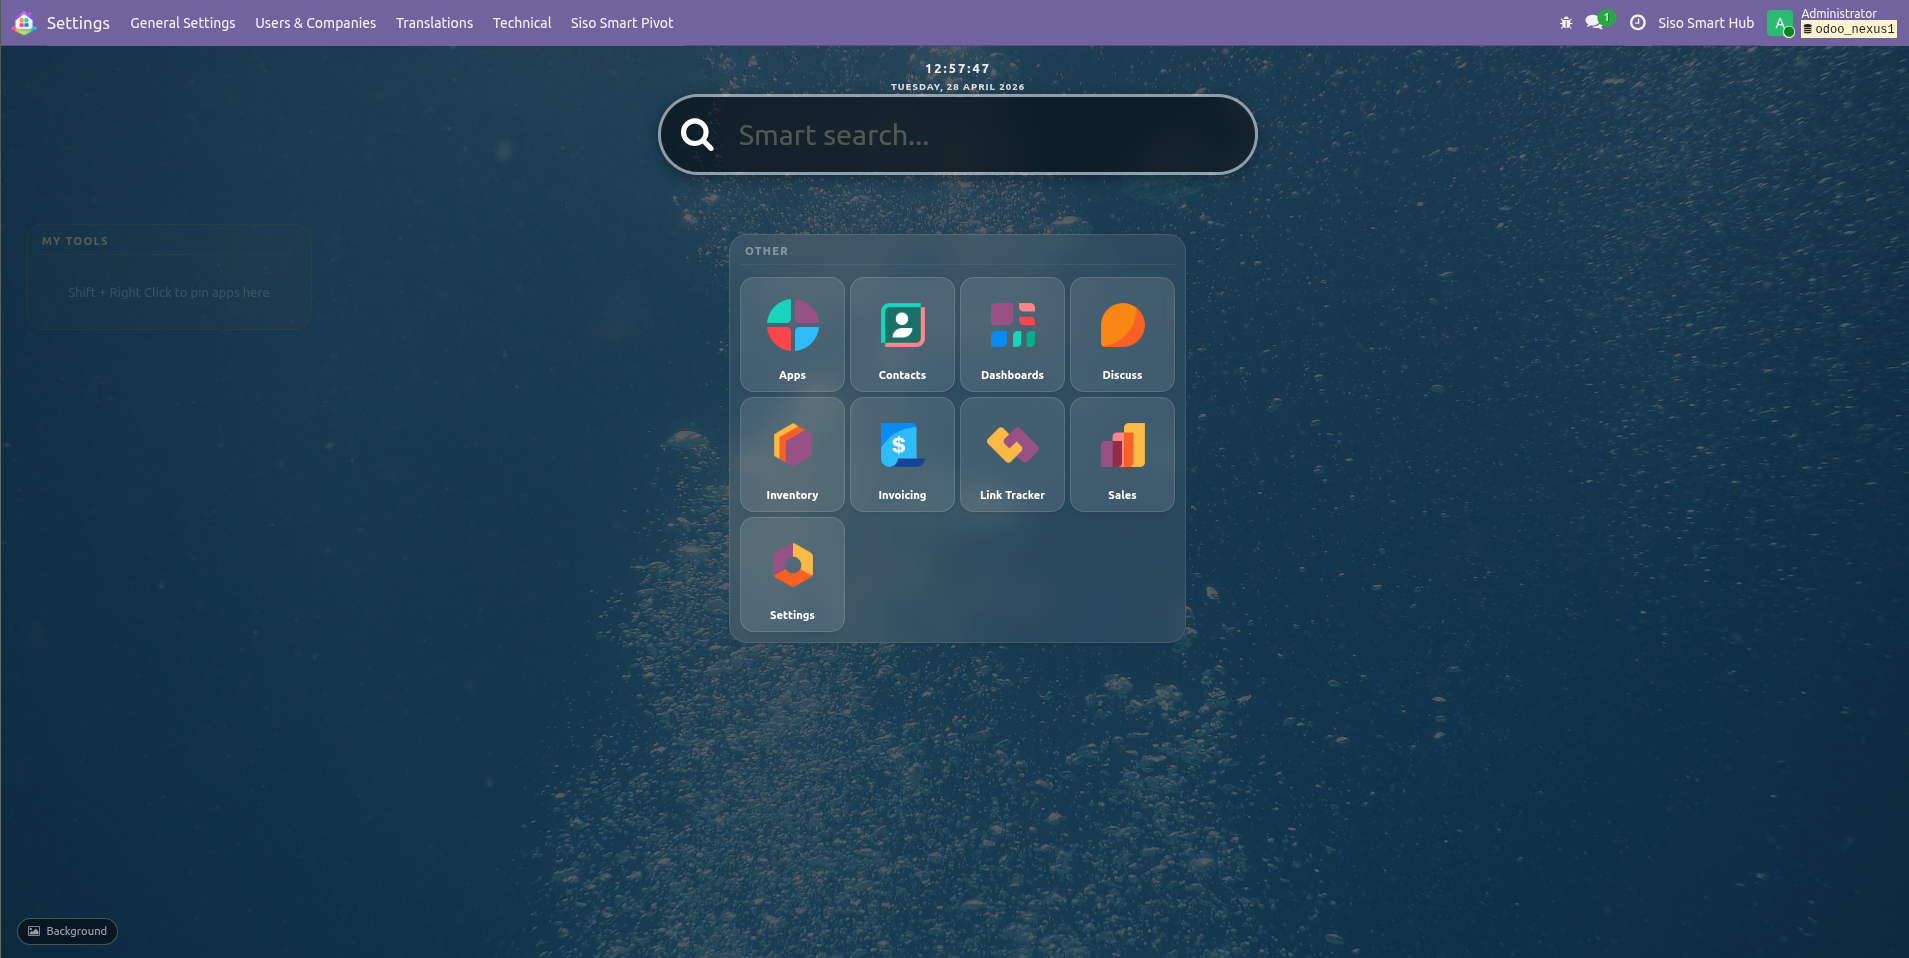
Siso Smart Hub is a replacement for the default application launch menu — the Odoo "home screen" — which is otherwise only available in paid Odoo license tiers. A key advantage is that users of the Community Edition can deploy and take full advantage of The Hub at no additional platform cost.
After installing Siso Smart Hub, users are greeted by a new home button and a visually attractive home screen where they can more easily find and navigate their installed apps. A deliberate design choice is that app icons are organized alphabetically, making it faster to find the right application at a glance.
The Hub ships with a pleasant default wallpaper, and users can replace it with an image of their own choosing at any time. Administrators have the option to set a single wallpaper for all users and can lock the setting to prevent individual customization.
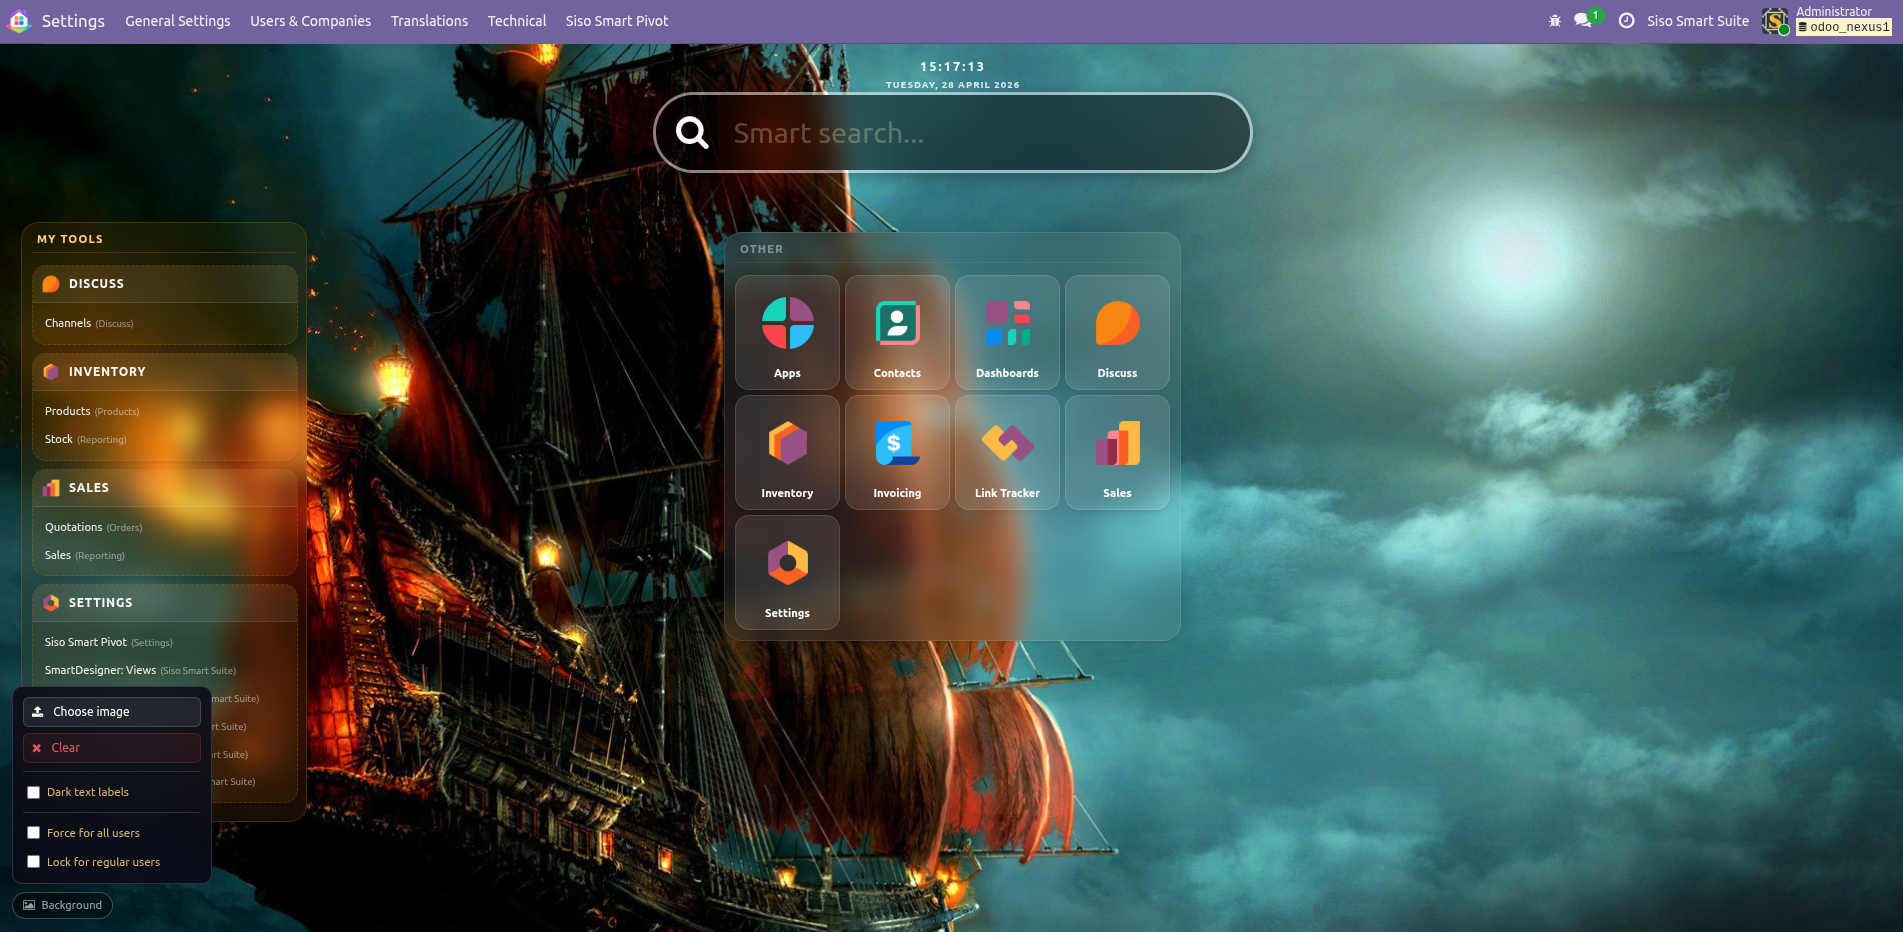
Prominently featured at the top of The Hub is a Smart Search box that is instantly focused whenever The Hub is opened. Smart Search supports both straightforward app and menu searches as well as sophisticated keyword-based searches across any model in Odoo — making it fast and easy to locate records like products, contacts, quotations, and more without navigating through menus. Smart Search also incorporates search symbology for wildcards, multi-field matching, and exact lookups.
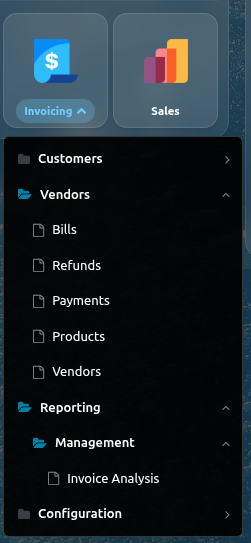
Beyond icons, each app's text label in The Hub opens a direct menu shortcut: for example, the Inventory app's label reveals menu items such as "Products → Products," allowing users to navigate straight to a view without opening the app and clicking through its menu hierarchy.
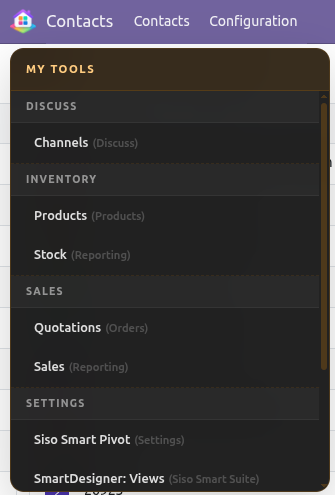
Users can pin any menu item to the personal My Tools container on the left side of The Hub, building a curated collection of frequently used views. My Tools are also accessible from anywhere in Odoo by hovering over the Smart Hub icon in the top-left corner for a moment — so users never have to return to The Hub just to reach their pinned shortcuts.
As a small quality-of-life improvement, Siso Smart Hub also applies a subtle yellow background to input fields across Odoo, making active form fields easier to identify at a glance.
Part 1 of this document covers the features available to all users. Part 2 covers administration, installation, and the various customization options available to system administrators.
Part 1
User Basics
Essential features and navigation for all Siso Smart Hub users.
Chapter 1
Navigating The Hub
The standard Odoo menu icon has been replaced by the Siso Smart Hub icon  . Clicking this icon opens "The Hub," a clean, alphabetized interface for all your installed applications.
Chapter 2
Enhanced App Navigation
While clicking an app icon launches it as usual, Siso Smart Hub provides deeper integration. The app title beneath each icon serves as a shortcut to that app's internal menu items.
These menu items can also be found via Smart Search or pinned to My Tools for even faster access in the future.
Chapter 3
Using Smart Search
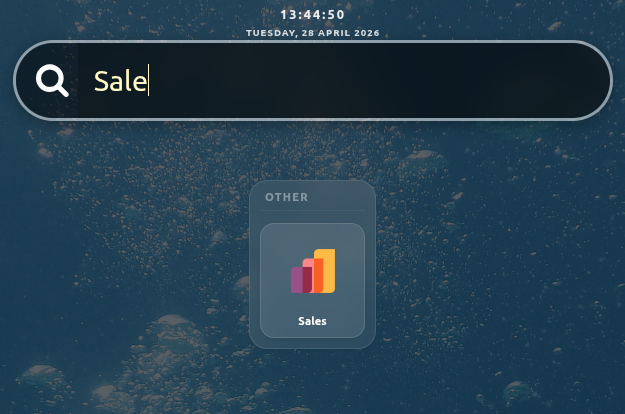
The Smart Search box at the top of The Hub is automatically focused upon opening. It supports both simple app lookups and complex data queries.
Advanced Search Features
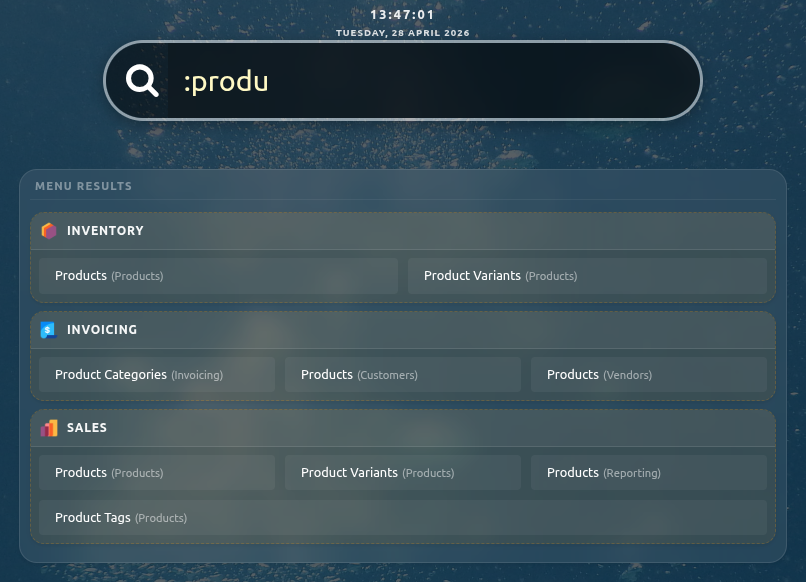
- Menu Search: Prefix your search with a colon (
:) to find specific menu items across all apps (e.g., :produ).
- Model Search: Quickly locate records like products, contacts, or quotations directly from The Hub.
- Keyword Search: Initiate a search within a defined scope by typing the keyword followed by a colon (e.g.,
P:).
See Appendix A for details.
- Clear Search: Press
ESC at any time to clear the search input.
Clearing Smart Search
Press ESC at any time to clear the Smart Search input and return to the full app view.
Chapter 5
Choosing Your Background
Personalize your workspace by changing The Hub's wallpaper. Click the Background button in the bottom-right corner of the Hub to open the background panel. The button is hidden for regular users when an administrator has locked wallpaper changes; administrators always see it.
User Controls
1
Click Choose image to select a wallpaper from your computer. Any common image format is accepted.
2
Once a wallpaper is set, choose how it fills the screen using the
Display mode buttons:
- Fill — scales the image to cover the entire screen, cropping edges if needed.
- Fit — scales the image to fit entirely within the screen without cropping.
- Tile — repeats the image at its natural size to fill the background.
Your choice is stored per user and persists across sessions.
3
Toggle Dark text labels if your wallpaper is light-coloured and the Hub text becomes hard to read.
4
To revert to the default wallpaper, click Clear (only visible when a wallpaper is active).
Administrator Controls
When logged in as a superuser, the background panel includes an additional admin section with company-wide controls:
- Force for all users
- When enabled, all users see the company wallpaper instead of their personal choice. Upload the company wallpaper using the Company wallpaper button directly below the toggle.
- Lock for regular users
- Prevents non-admin users from changing or clearing their personal wallpaper. The Background button is hidden for locked users.
- Upload favicon
- Replaces Odoo's default browser tab icon with a custom image of your choice, company-wide. Any image format is accepted;
.ico files are recommended for best browser compatibility. Click Clear favicon to restore the Odoo default. The tab icon updates immediately — no page reload required.
Chapter 6
Choosing Your Home Screen
You can designate any app or menu item as your default home screen. This screen will open automatically whenever you access Odoo.
Set Default Home
Hold CTRL + ALT and Right-Click any icon or menu item in The Hub to set it as your default home screen.
Part 2
Administration
Configuration and management options for system administrators.
Chapter 7
Installing Siso Smart Hub
Siso Smart Hub is available on the Odoo App Store. Installation takes under two minutes with no server restart required.
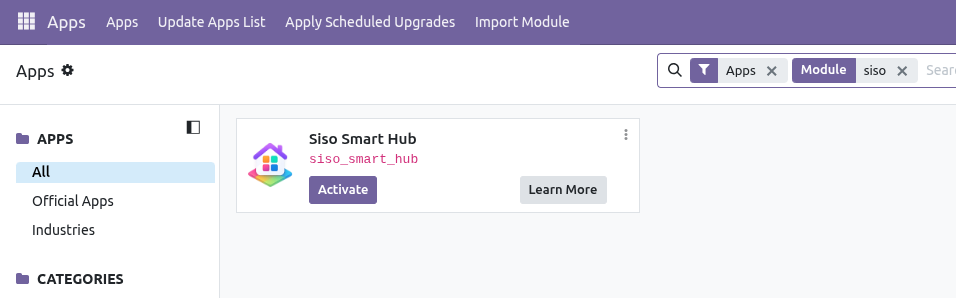
1
Open Apps: Navigate to the Apps menu in your Odoo instance.
2
Search: Type Siso Smart Hub in the search bar and press Enter.
3
Activate: Click Install on the Siso Smart Hub card. Odoo will install the module and any dependencies automatically.
Manual / Self-Hosted Installation
If installing from a downloaded archive rather than directly from the App Store: place the siso_smart_hub directory in your Odoo addons path, restart the Odoo service, then navigate to Apps → Update Apps List before searching and activating.
Post-Installation
Once activated, the Smart Hub logo will replace the default Odoo menu icon, indicating the system is ready for use.
Configuration Access
Superusers can manage all Siso Smart Suite modules under Settings → Technical. Siso-specific configurations are grouped in their own section near the bottom of the menu.
Chapter 8
Upgrading Siso Smart Hub
When a new version is available on the App Store, Odoo will indicate that an upgrade is ready on the module card.
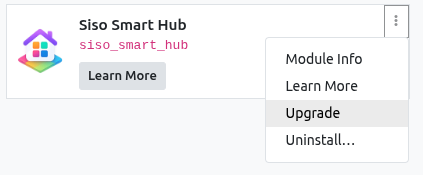
1
Open Apps: Navigate to the Apps menu and search for Siso Smart Hub.
2
Upgrade: Click the Upgrade button on the module card (or select Upgrade from the three-dot menu). Odoo applies the update automatically.
Manual / Self-Hosted Upgrade
Replace the siso_smart_hub files in your addons directory with the new version, then click Upgrade in the Apps list. A database backup beforehand is always recommended for self-hosted environments.
Chapter 9
Customizing Layout: Groups
By default, all apps are organized under a group labeled "Other." While this label is fixed, you can create custom groups to better organize your workflow.
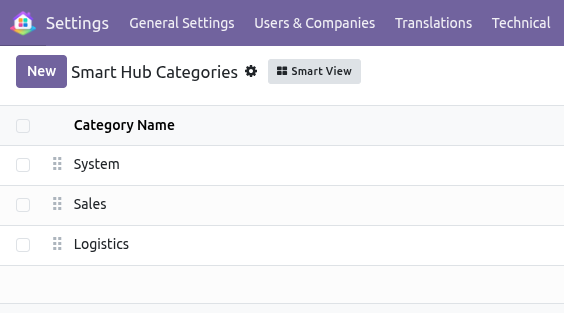
Managing Categories
Navigate to Settings → Technical → SmartHub: App Categories to manage your groups. Here, you can create, edit, or delete labels that will be used to categorize your applications in the next step of the configuration process.
Workflow Optimization
Creating logical groups (e.g., "Sales," "Logistics," "System") significantly improves the user experience by reducing the time spent searching for related applications.
Chapter 10
Organizing Apps into Groups
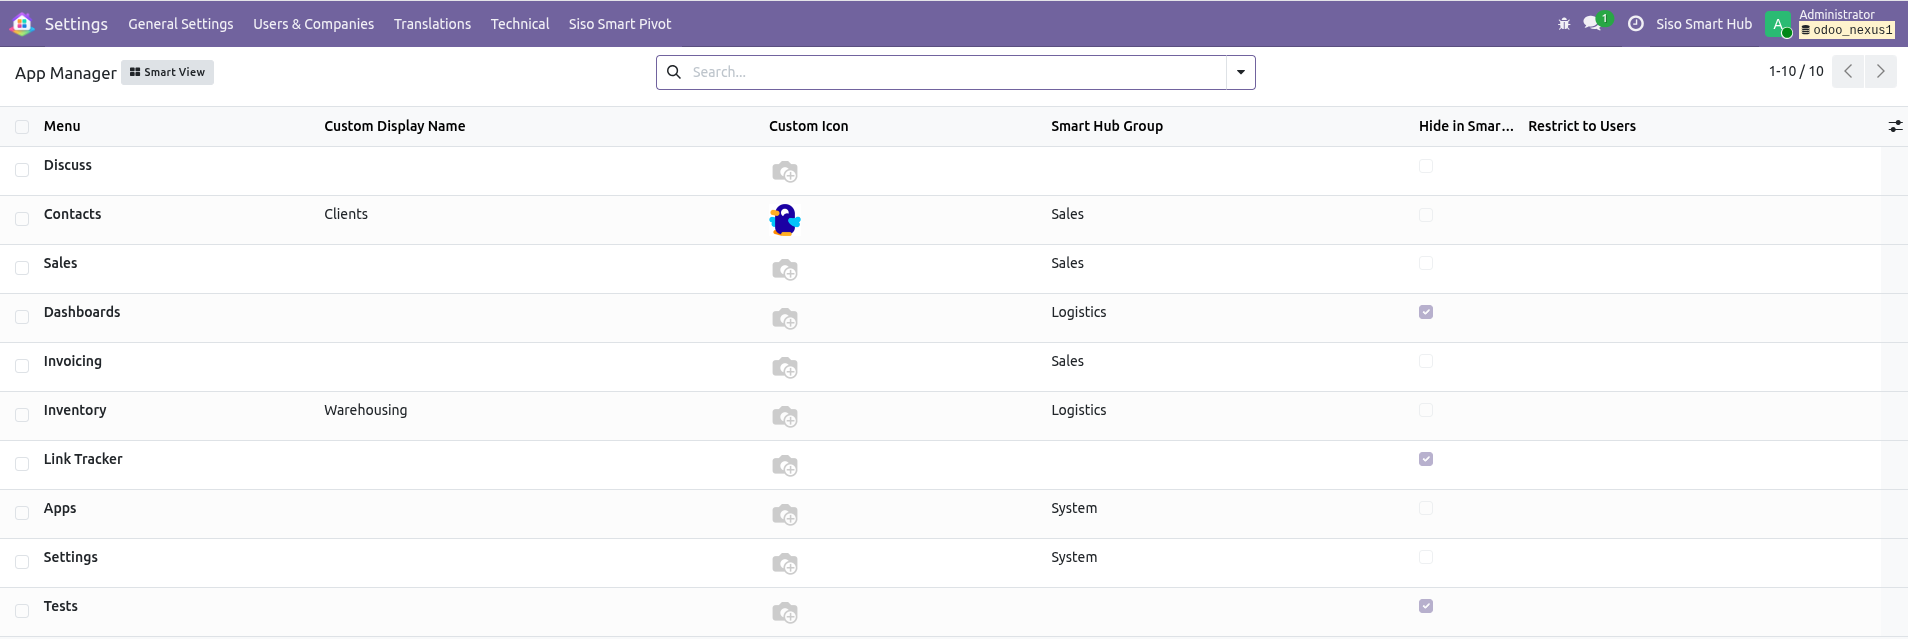
After defining your groups, use the SmartHub: App Settings menu under Technical to assign applications to them. The App Manager provides a centralized interface for customizing how each app appears in The Hub.
App Customization Options
- Custom Labels: Rename apps as they appear in The Hub for better clarity.
- Custom Icons: Set unique icons for each application.
- Group Assignment: Assign apps to the categories created in the previous chapter.
- Visibility Control: Hide specific apps from The Hub or restrict their visibility to certain users.
Immediate Effect
Once saved, all configuration changes take immediate effect for all users across the system.
Chapter 11
Smart Search Customization
Smart Search allows administrators to create powerful keyword-based search shortcuts. While basic setup is straightforward, advanced configurations may require familiarity with Odoo's underlying model structure.
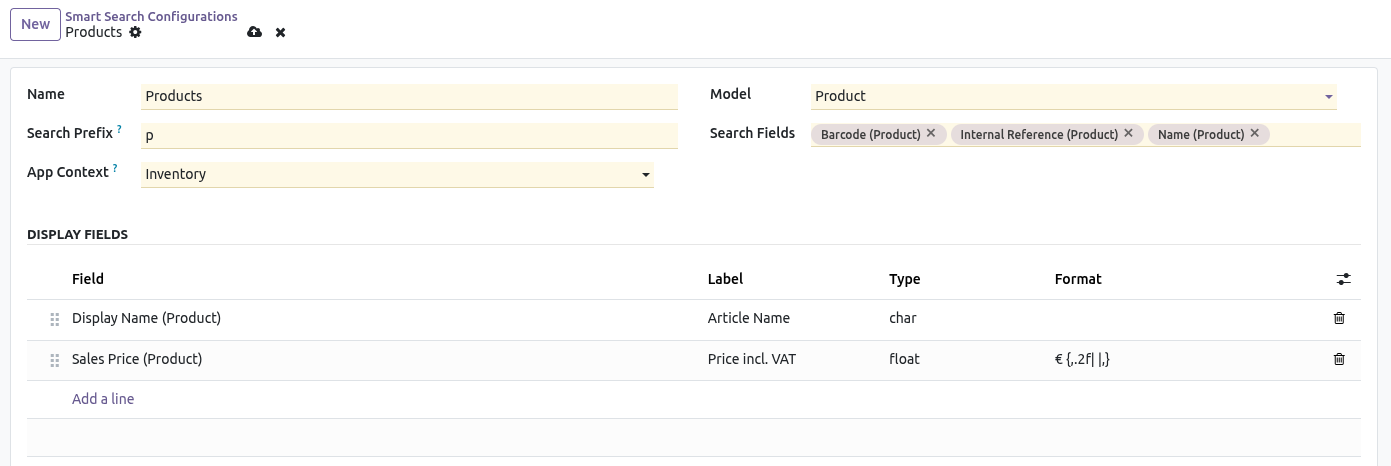
To begin, navigate to Settings → Technical → SmartHub: Smart Search. By default, the list is empty; click New to create your first keyword search.
Configuration Example: Product Search
Consider a search for products using the prefix "P" (case-insensitive). This configuration can be set to query the "Barcode," "Internal Reference," and "Name" columns, returning the "Display Name" and "Sales Price" to the user.
Field Definitions
- Name
- An administrative title for the configuration, used only for internal reference in the list view.
- Search Prefix
- The trigger keyword or symbol used in The Hub (e.g., "P" for products, "C" for contacts). We recommend short, intuitive prefixes.
- App Context
- Optional. Designates a specific app to serve as the wrapper for the view when a user clicks a search result.
- Model
- The specific database model to be queried.
- Search Fields
- The specific columns within the model that Smart Search will query.
- Display Fields
- The fields that will be visible to the user in the search results. These should be arranged in an intuitive order.
- Label
- Allows customization of column titles to make search results more intuitive for users.
- Type
- A read-only hint from the model indicating the data type (e.g., text, float, integer).
- Format
- Applies to date, datetime, time, float, integer, and monetary fields. This enables complex value presentation in search results. See Appendix B for detailed instructions.
Appendix A
Keyword Search Symbology
Advanced operators for refining your Smart Search queries.
Search Operators
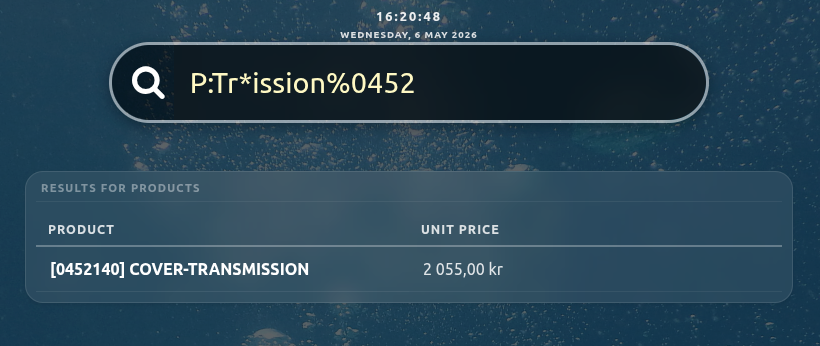
When keyword search rules are defined, you can use special characters to help narrow your results. To initiate a keyword search, type the keyword followed by a colon (e.g., P:) and then your search term.
The following operators allow for powerful, pinpoint location of records within your defined search scopes:
| Character | Name | Function | Example |
|---|
* | Asterisk | Wildcard Search: Simplifies searching within a target value by matching any sequence of characters. | P:Tr*ission |
% | Percent | Multi-Field Search: Allows searching across multiple fields simultaneously (e.g., name and reference). | P:Tr*ission%0452 |
! | Exclamation | Explicit Match: Returns only records that exactly match the provided value (useful for barcodes or IDs). | P:0452140! |
Overview
Format patterns are optional strings entered in the Format column of the Display Fields table inside a Smart Search configuration. When a pattern is present, the raw field value is transformed before it is rendered in the search-results grid. When no pattern is given, the system falls back to the field's natural string representation (display_name for relational fields, plain str() for everything else).
Empty Values
An empty or False field value always renders as an empty cell, regardless of the pattern applied.
Date, Datetime and Time
All three types are formatted using Python's strftime format codes. The full input value is passed to strftime(pattern), so any valid strftime string works. Any literal text written between codes — including punctuation, spaces, and words — is passed through unchanged.
| Code | Meaning | Example output |
|---|
%d | Day of month, zero-padded | 01 – 31 |
%e | Day of month, space-padded | 1 – 31 |
%m | Month number, zero-padded | 01 – 12 |
%b | Abbreviated month name | Jan, Feb … |
%B | Full month name | January, February … |
%y | 2-digit year | 25, 26 |
%Y | 4-digit year | 2025, 2026 |
%H | Hour (24-hour), zero-padded | 00 – 23 |
%I | Hour (12-hour), zero-padded | 01 – 12 |
%M | Minute, zero-padded | 00 – 59 |
%S | Second, zero-padded | 00 – 59 |
%p | AM / PM | AM, PM |
%A | Full weekday name | Monday, Tuesday … |
%a | Abbreviated weekday name | Mon, Tue … |
%j | Day of year | 001 – 366 |
%W | Week number (Mon-first) | 00 – 53 |
%Z | Timezone name (if present) | UTC, CET |
%% | Literal % character | % |
Examples
| Pattern | Input value | Output |
|---|
%d.%m.%Y | 2026-04-29 | 29.04.2026 |
%d/%m/%Y | 2026-04-29 | 29/04/2026 |
%Y-%m-%d | 2026-04-29 | 2026-04-29 |
%d. %B %Y | 2026-04-29 | 29. April 2026 |
%d %b %y | 2026-04-29 | 29 Apr 26 |
%H:%M | 09:05:00 | 09:05 |
%H:%M:%S | 09:05:32 | 09:05:32 |
%I:%M %p | 14:30:00 | 02:30 PM |
%d.%m.%Y %H:%M | 2026-04-29 09:05:00 | 29.04.2026 09:05 |
%A, %d. %B %Y | 2026-04-29 | Wednesday, 29. April 2026 |
Notes on Date / Time Fields
- For date fields, only date codes (
%d, %m, %Y, etc.) are meaningful; time codes produce 00 or empty values.
- For time fields, only time codes are meaningful; date codes are not applicable.
- For datetime fields, all codes apply to the full timestamp.
- Month and weekday names are rendered in the server's locale (typically English on most Odoo deployments) and are not automatically translated to the user's language.
Numeric Types (Float, Integer, Monetary)
All three numeric types share the same pattern syntax, which extends Python's built-in Format Specification Mini-Language with optional prefix, suffix, and separator overrides:
[prefix]{<python_spec>[|thousands_sep[|decimal_sep]]}[suffix]
| Part | Required | Description |
|---|
prefix | No | Arbitrary text placed before the number (e.g. kr , $) |
{ … } | Yes | Delimiters wrapping the specification |
python_spec | Yes | Python format spec (see table below) |
|thousands_sep | No | Replace the default , thousands separator with this string |
|decimal_sep | No | Replace the default . decimal separator with this string |
suffix | No | Arbitrary text placed after the number (e.g. NOK, %) |
Python Format Spec Reference
| Spec | Meaning | Example output (input 1234.5678) |
|---|
f | Fixed-point, 6 decimal places | 1234.567800 |
.2f | Fixed-point, 2 decimal places | 1234.57 |
.0f | Fixed-point, no decimals (rounds) | 1235 |
,.2f | Thousands-grouped, 2 decimals | 1,234.57 |
,.0f | Thousands-grouped, no decimals | 1,235 |
d | Integer, no decimals, no grouping | 1234 (integer / monetary only) |
,d | Thousands-grouped integer | 1,234 (integer only) |
.2e | Scientific notation, 2 sig. digits | 1.23e+03 |
.4g | General notation (drops trailing zeros) | 1234.6 |
+.2f | Force sign prefix | +1234.57 |
08.2f | Zero-padded to width 8 | 01234.57 |
Separator Override Rules
The two separator overrides are order-sensitive: if you want to override only the decimal separator you must still supply the |thousands_sep position (leave it empty to keep the default ,).
|thou — overrides thousands separator, keeps . as decimal mark.|thou|dec — overrides both separators.||dec — overrides only the decimal separator and removes the thousands grouping character entirely.
Examples
Basic formatting (no separator override)
| Pattern | Input | Output |
|---|
{,.2f} | 1234.5 | 1,234.50 |
{,.0f} | 1234.5 | 1,235 |
{.2f} | 1234.5 | 1234.50 |
{.0f} | 1234.5 | 1235 |
{+,.2f} | 1234.5 | +1,234.50 |
{,.2e} | 1234500 | 1.23e+06 |
Prefix and suffix
| Pattern | Input | Output |
|---|
$ {,.2f} | 1234.5 | $ 1,234.50 |
{,.2f} USD | 1234.5 | 1,234.50 USD |
({.0f}) | 1234.5 | (1235) |
≈ {,.1f} | 1234.5 | ≈ 1,234.5 |
Separator overrides — European conventions
| Pattern | Input | Output | Thousands | Decimal |
|---|
{,.2f| |,} | 1234.5 | 1 234,50 | space | , |
{,.2f|.|,} | 1234.5 | 1.234,50 | . | , |
{,.2f||,} | 1234.5 | 1234,50 | (none) | , |
{,.2f|,|.} | 1234.5 | 1,234.50 | , | . (default) |
Combined prefix, separator override and suffix
| Pattern | Input | Output |
|---|
kr {,.2f| |,} | 1234.5 | kr 1 234,50 |
{,.2f| |,} NOK | 1234.5 | 1 234,50 NOK |
kr {,.2f| |,} NOK | 1234.5 | kr 1 234,50 NOK |
$ {,.2f} | 9876543.2 | $ 9,876,543.20 |
€ {,.2f|.|,} | 9876543.2 | € 9.876.543,20 |
Integer fields
| Pattern | Input | Output |
|---|
{d} | 1234 | 1234 |
{,d} | 1234 | 1,234 |
{,d| } | 1234 | 1 234 |
{08d} | 42 | 00000042 |
{.0f} | 1234 | 1234 (same as d for integers) |
Percentage and other derived units
| Pattern | Input | Output |
|---|
{.1f} % | 0.856 | 0.9 % |
{.0f}° | 37.6 | 38° |
Notes on Numeric Formatting
- The
python_spec must not contain } or | characters; these are reserved as delimiters.
- If no
{…} block is present, the entire pattern string is used as a bare Python format spec (i.e. format(value, pattern)). This covers simple cases like .2f without prefix or suffix.
- For integer fields, specs with a decimal point (
.2f) are accepted and apply rounding, but d is the canonical integer spec.
- For monetary fields, the raw stored float value is formatted. No currency symbol is injected automatically unless you add one as a prefix or suffix in the pattern itself.
- If the pattern raises any exception (invalid spec, wrong type), the system falls back to
str(value) so results remain visible even with a malformed pattern.